Install from binaries#
After downloading XLiFE++ from the Download XLiFE++ page, you will have to install and run the installer if you are on Windows, or follow the configuration procedure with cmake by setting a C++ compiler, paths to Gmsh and Paraview, and eventually paths to external libraries BLAS, LAPACK, Arpack and UmfPack libraries. In following sections, you will be guided on which options you may use or not as far as sources or binaries are concerned.
Installing files#
Unix/Linux
XLiFE++ provides packages for Debian/Ubuntu (.deb) and Fedora (.rpm).
For Debian/Ubuntu/Mint, you just have to run the following command:
$ sudo dpkg -i xlifepp-binaries-...-64bits.deb
For Red Hat/OpenSUSE/Fedora, you just have to run the following command:
$ sudo rpm -i xlifepp-binaries-...-64bits.rpm
Caution
When the installation process is done, you just have to add /usr/local/xlifepp/bin in your PATH.
macOS
XLiFE++ provides a .dmg file, that works like an archive of the XLiFE++ binaries. So you have to open the .dmg file, then you copy the whole content where you want to copy it, let’s say XLDIR. Then, you have to run Cmake on XLDIR and configure every dependency as explained in How to configure installation process.
When the installation process is done, you just have to add XLDIR/bin in your PATH.
Windows
When downloading binaries under Windows, you just have to run the XLiFE++ installer. Before running the installer, the following tools mut be installed prior:
a C++ compiler (e.g x86_x64-8.1.0 or the compiler provided by CodeBlocks : codeblocks-20.03mingw-setup.exe),
the Cmake tool,
the Gmsh mesher,
an EDI such as CodeBlocks and the vizualization tool Paraview that are not mandatory but highly recommended.
Do not forget to add pathes of these tools to your Windows PATH [1] system environnement variable.
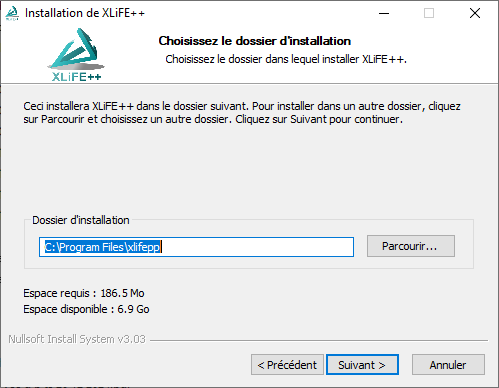
Run the XLiFE++ installer with administrator elevation. If a previous distribution of XLiFE++ is installed in the folder you choose, the installer can remove it itself. Furthermore, it is highly recommended installing every component.

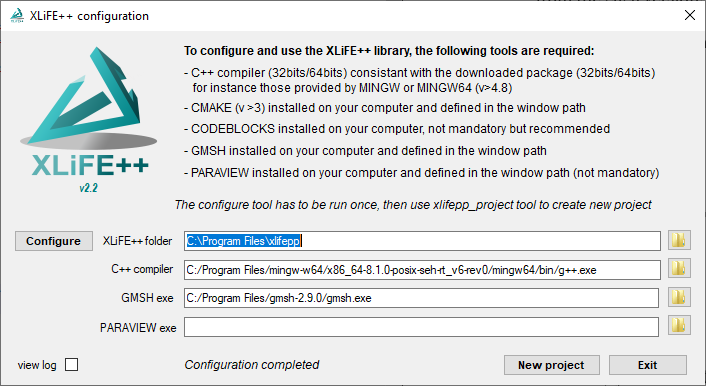
Now, in the bin subdirectory of the XLiFE++ install directory, you will find xlifepp_configure.exe. To run it, administrator elevation is required.
-
First, you have to set the folder containing XLiFE++.

-
As mentioned in the banner, a C++ compiler, Cmake , Gmsh , CodeBlocks and Paraview must be installed. Click on the Configure button.

When everything is OK, message “Configuration complete” is displayed. You can fill an empty field (for instance the path to the Paraview exe) and run again the configure tool.
To deal with your own application, you can click on the New project button or run xlifepp_new_project.exe; see The graphical way for more details.
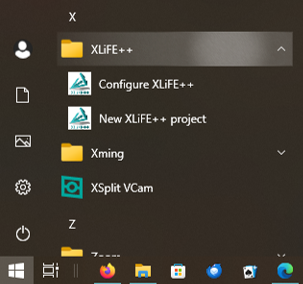
The configure tool and the new project tool are also available from the windows menu:

How XLiFE++ binaries are organized#
XLiFE++ binaries are organized in several directories, described as follows for the main ones:
bin-
contains the
xlifepp_project_setup.exefor Windows and the user scriptsxlifepp.shandxlifepp.bat. This will be explained later. etc-
contains a lot of stuff such as templates for installation, the multilingual files, …
share/examples-
contains example files ready to compile and use.
ext-
contains source files for external dependencies, such as Arpack, Eigen, Amos libraries
tests-
contains all unitary and system tests to check your installation
lib-
contains the static libraries of XLiFE++.
You also have a very important file CMakeLists.txt, that is the Cmake compilation script.
How to configure installation process#
Caution
In the following, we will consider Cmake used in command-line mode, from a build directory directly inside sources so that the path to CMakeLists.txt file is ..
Installation options that will be explained can be set directly through GUI applications.
Important
cmake options are cache entries, that is to say entries being stored in CMakeCache.txt. As a result, you can re-run cmake without setting the same options again. With GUI applications, you just have to set them.
cmake .. [options]
cmake ..
Binaries are compiled with all extensions, OpenCASCADE and Magma excepted. OpenCASCADE will be integrated soon
So, the first thing to do is to run cmake with the defaut behavior mayeb by telling which compiler you want:
$ cmake .. [-DCMAKE_CXX_COMPILER=<your-compiler>]
macOS
If you want to use clang++ as a compiler (the default chosen on macOS by CMake), please download specific clang++ binaries, as they are necessarily generated without OpenMP activated.
In the following, we will focus on cache entries you may have to set to configure XLiFE++.
Hint
When Cmake is running, it stores values of cache entries in a cache file CMakeCache.txt in the build directory. As a result, when you run again Cmake, you are not forced to give already given options.
Binaries are always compiled with full dependencies.
For every external dependency, Cmake search files in standard environment paths and in specific paths defined in Cmake configuration script. So if external dependencies are installed by package managers, Cmake will find them.
If it is not the case, or if the library found is not the one you want to use, you can tell Cmake where to find them, as we will see in the following.
Configuring paths to Gmsh and Paraview executables#
To set paths to Gmsh and Paraview executables, you may use the following options:
-
XLIFEPP_GMSH_EXECUTABLE: -
to set the full path to Gmsh executable
-
XLIFEPP_PARAVIEW_EXECUTABLE: -
to set the full path to Paraview executable
macOS
You have to set the full path to Gmsh/Paraview executables and not applications (.app files). Executables are inside applications. If application names are Gmsh.app and paraview.app and are located in the Applications directory, Gmsh and Paraview executables will be correctly detected.
So your call to Cmake will look like:
$ cmake .. [other_options] -DXLIFEPP_GMSH_EXECUTABLE=path/to/gmsh/executable -DXLIFEPP_PARAVIEW_EXECUTABLE=path/to/paraview/executable
Configuring dependency on FORTRAN library#
IF you want to set dependency on BLAS, LAPACK, Arpack and/or UmfPack, you will have to set the path to FORTRAN library.
If you use g++, you have nothing to do as it is provided by gcc suite. The same goes for Intel compiler.
macOS
First, FORTRAN library is not installed by default. SO you have to install it with your favourite package manager, such as brew, by installing gcc itself.
Then, clang++ is not able to find FORTRAN library.
To do so, you just have to use the option XLIFEPP_FORTRAN_LIB_DIR:
$ cmake .. [other_options] -DXLIFEPP_FORTRAN_LIB_DIR=path/to/gfortran/library/directory
Attention
Setting the directory is sufficient only if the FORTRAN library name is standard, such as libgfortran.a, libgfortran.so, libgfortran.dylib, libgfortran.dll, gfortran.lib, …
If ever it is not the case, prefer using option XLIFEPP_FORTRAN_LIB instead, to set the full path to FORTRAN library
Configuring dependency on BLAS and LAPACK libraries#
Normally, BLAS and LAPACK are automatically detected if they are installed. But if they are not found, in order to tell to Cmake where to find BLAS library, you just have to set the directories containing BLAS and LAPACK libraries, with the options XLIFEPP_BLAS_LIB_DIR and XLIFEPP_LAPACK_LIB_DIR
So your call to Cmake will look like:
$ cmake .. [other_options] -DXLIFEPP_BLAS_LIB_DIR=path/to/blas/library/directory -DXLIFEPP_LAPACK_LIB_DIR=path/to/lapack/library/directory
Attention
Setting the directory is sufficient only if the BLAS library name is standard, such as libblas.a, libblas.so, libblas.dylib, libblas.dll, blas.lib, … (the same goes for LAPACK)
If ever it is not the case (meaning that BLAS and/or LAPACK are not installed properly, for instance with a version number as a suffix), prefer using options XLIFEPP_BLAS_LIB and XLIFEPP_LAPACK_LIB instead, to set the full path to BLAS and LAPACK libraries
Windows
If you downloaded binary libraries of BLAS and LAPACK provided by the XLiFE++ website, as recommended in Third-party extensions, it will be something like (if you downloaded 64bits binaries):
$ cmake .. [other_options] -DXLIFEPP_BLAS_LIB_DIR="C:/.../lapack-3.5.0_64" -DXLIFEPP_LAPACK_LIB_DIR="C:/.../lapack-3.5.0_64"
Configuring dependency on Arpack library#
First, you have to choose if you want to use the internal Arpack distribution of XLiFE++, or an external one. Of course, the one provided by XLiFE++ is detected automatically. To select the rightful mode, you have to set the option:
-
XLIFEPP_SYSTEM_ARPACK -
To choose an external distribution of Arpack or the one provided by XLiFE++. Possible values are ON or OFF. Default is OFF, to use the distribution provided by XLiFE++
If you choose to use an external distribution of Arpack, you now have to tell Cmake where to find Arpack library. To do so, you just have to set the directory containing the Arpack library, with the option XLIFEPP_ARPACK_LIB_DIR:
$ cmake .. [other_options] -DXLIFEPP_BLAS_LIB_DIR=path/to/blas/library/directory
Attention
Setting the directory is sufficient only if the Arpack library name is standard, such as libarpack.a, libarpack.so, libarpack.dylib, libarpack.dll, arpack.lib, …
If ever it is not the case (meaning that Arpack is not installed properly, for instance with a version number as a suffix), prefer using option XLIFEPP_ARPACK_LIB instead, to set the full path to Arpack library
Windows
If you downloaded binary libraries of Arpack provided by the XLiFE++ website, as recommended in Third-party extensions, it will be something like (if you downloaded 64bits binaries):
$ cmake .. [other_options] -DXLIFEPP_ARPACK_LIB_DIR="C:/.../ARPACK_64/lib_mingw64"
Configuring dependency on UmfPack libraries#
UmfPack is a part of SuiteSparse distribution (that also contains amd, colamd, camd, ccolamd, cholmod, metis, and suitesparseconfig, …).
To tell to Cmake where to find UmfPack library/SuiteSparse distribution, you just have to set the home directory containing the SuiteSparse distribution, with the option XLIFEPP_SUITESPARSE_HOME_DIR:
$ cmake .. [other_options] -DXLIFEPP_SUITESPARSE_HOME_DIR=path/to/suitesparse/home/directory
windows
If you downloaded binary libraries provided by the XLiFE++ website, as recommended in Third-party extensions, it will be something like (if you downloaded 64bits binaries):
$ cmake .. [other_options] -DXLIFEPP_SUITESPARSE_HOME_DIR="C:/.../SuiteSparse_64"
Hint
Metis is not always installed when installing SuiteSparse, so this dependency is not necessary when setting UmfPack. In this case, XLiFE++ installation process will tell you Metis is not found by this has no consequence.
Hint
If setting XLIFEPP_SUITESPARSE_HOME_DIR is not enough to find every library of SuiteSparse distribution, you can use specific options of the form:
-
XLIFEPP_XXX_INCLUDE_DIR -
to specify the XXX header, where XXX can be AMD, COLAMD, CAMD, CCOLAMD, CHOLMOD, METIS, SUITESPARSECONFIG or UMFPACK.
-
XLIFEPP_XXX_LIB_DIR -
to specify the XXX library, where XXX can be AMD, COLAMD, CAMD, CCOLAMD, CHOLMOD, METIS, SUITESPARSE (only on macOS), SUITESPARSECONFIG or UMFPACK.
Setting the directories is sufficient only if the SuiteSparse library names are standard, such as libamd.a, libamd.so, libamd.dylib, libamd.dll, amd.lib, … (the same goes for the other libraries)
If ever it is not the case (meaning that SuiteSparse is not installed properly, for instance with a version number as a suffix), prefer using option XLIFEPP_XXX_LIB instead, to set the full path to SuiteSparse libraries, where XXX can be AMD, COLAMD, CAMD, CCOLAMD, CHOLMOD, METIS, SUITESPARSE (only on macOS), SUITESPARSECONFIG or UMFPACK.
Configuring dependency on Magma library#
To tell to Cmake where to find Magma library, you just have to set the directory containing the Magma library, with the option XLIFEPP_MAGMA_LIB_DIR and the directory containing the Magma header files, with the option XLIFEPP_MAGMA_INCLUDE_DIR:
$ cmake .. [other_options] -DXLIFEPP_MAGMA_LIB_DIR=path/to/magma/library/directory -DXLIFEPP_MAGMA_INCLUDE_DIR=path/to/magma/include/directory
